Multi-Factor Auth inside Office365

Hi, todays article is about Multi-Factor Auth for Office365.
First of all, lets explain what is it, what are the benefits and then proceed to explain how to enable, configure and manage it via GUI and PowerShell…
WHAT IS IT AND WHAT ARE THE BENEFITS?
Multi-Factor Auth is a multiple validation system that allows us to fortify the security when accessing out system, but not just that, it also allows us to know when someone is trying to access our data and be able to notify as fraud the undesired access. All this with the smple use of an SMS code, telephone call, mobile phone call or via APP.
So, does that means that I will have to input a code each time a access my mailbox?, not exactly, unless you select the send message or call options, our installed APP will be the one in charge to notify us of the access petition and be able to answer if we authorize or decline it.
And what happens with each program on which a make use of my account, will I have to authorize them each time they try to access my data? no, we have the option to configure a unique «APP Password» for every program with a unique activation.
Does that means I can create as many APP Passwords I want? No, we have a 40 APP Passwords limit.
What programs can I use with my APP Password? We can make use of known programs like Microsoft Outlook, Microsoft Lync, Office 2013 suite, and some others like Lync mobile client, Windows 8 and 8.1 Mail APP or the Office365 Activation assitant.
What is the name of the APP that I can use to authenticate the access? The APP is called «Multi-Factor Auth» and it’s available for IOS, Android and Windows Phone of course, just search for it on the store.
Is this feature available for all of the Office365 plans? No, just for MidSize, Enterprise (E1, E3 and E4) and Standalone (Exchange Online and Sharepoint Online) plans, so no Small Business plans are supported.
HOW TO ENABLE THIS USING GUI
To enjoy this feature we just have to enter our Office365 portal as an admin and enable it for the users we want:
-
Enter our Office365 portal (http://portal.microsoftonline.com) as an admin and click on «Users and Groups» and then on «Set up» dentro de «Set Multi-factor Authentication requirements»:
- On «View» select the view to be applied of the users we want to be shown, in my case I selected «Sign in allowed users«:
- Select the users we want to enable and click on «Enable» and «Enable multi-factor auth» on the popup window:
Once the admin part is done, we can now proceed to do the user part. This is what the user is supposed to do once he enters the first time to the portal. It’s very important that the user logs in onto the portal before doing anything else with his account.
-
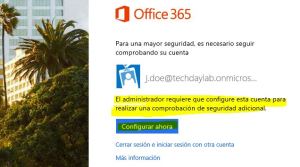
Enter the Office365 portal (http://portal.microsoftonline.com) as the user and we will find the following screen in which we must click on «set it up now«:
- This will take us to the aditional security verification page, select the option we want and continue, on this case we will select «Notify me through app» and then click on «Configure«:
- Follow the steps and click on «Done«:
- Once this is done, t will ask us if we make use of programs like Microsoft Outlook or Lync to create APP Passwords, in this case we will assume the user makes use of Microsoft Outlook, so we’ll create one clicking on «Create«:
- Assign a name for the program, copy and paste the generated code inside the credentials request of our Microsoft Outlook. This password will not be shown again so it’s important to copy and paste it directly :
- If we have the need to create more APP Passwords or modify the contacting method, we just have to enter our portal, click on the little hog on the upper right side and then on «Office365 Settings», select the option «additional security verification» and click on «Update my pnone numbers used….», this will give us access to the settings and APP Passwords configuration area:
HOW TO ENABLE THE FEATURE WITH POWERSHELL
In order to work with Multi-Factor Auth, we must follow the next steps:
-
Download and intall the Windows Azure Active Directory Powershell module
- Run the following Cmdlets:
Connect-MsolService $MultiFactorAuth= New-Object -TypeName Microsoft.Online.Administration.StrongAuthenticationRequirement $MultiFactorAuth.RelyingParty = «*» $MultiFactorAuth = @($MultiFactorAuth)
Once the object has been created, you can start running the different options:
- To enable just one specific user:
Set-MsolUser -UserPrincipalName user@domain.com -StrongAuthenticationRequirements $MultiFactorAuth
- Enable on all users:
Get-MsolUser -All | Set-MsolUser -StrongAuthenticationRequirements $MultiFactorAuth
- List all users with the enabled feature:
Get-MsolUser | Where-Object {$_.StrongAuthenticationRequirements -like «*»} | select DisplayName,UserPrincipalName,StrongAuthenticationMethods,StrongAuthenticationRequirements
- Disable the feature on a specific user:
$MultiFADisable = @() Set-MsolUser -UserPrincipalName j.doe@techdaylab.onmicrosoft.com -StrongAuthenticationRequirements $MultiFADisable
Just one thing, If we enable this feature on an admin account, keep in mind it wont be able to manage the subscription via PowerShell because its not supported, to do so, Microsoft recommends to create another account without any license applied and strong password to be used for powershell.
TESTING THE APP:
Once we try to log in via the portal, it will show us a notification on the app where it asks us to verify or cancel:


