Archive for Lync 2013

Skype for Business 2016 Freezing (Kaspersky Endpoint Protection 10)

Hey!

Today I bring to you an issue I found on my own computer.

I got Skype for Business 2016

image

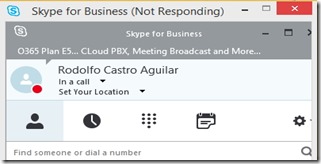
When I try to connect to a Conference or when someone add me or try to share app. My client freeze and need to go to task manager to stop the process.

Yesterday I put my attention to solve the issue, and found something else. The .ost was blocked after kill the process. … so I can’t start Outlook or Skype for Business after Freeze, So I need to restart the machine.

Image 274

What can block a file? My first though was Antivirus, my computer got Kaspersky Endpoint Protection 10. So, I stop all the protection suite and test…

NO MORE FREEZING!

Again, we need to add exception/trusted zone our Skype for Business Client.

Then , Start the Kaspersky protection and add Lync.exe (yes, I know…  ¬¬ ) to the Trusted Zone and Apply the configuration

Image 276

All works perfect now.

Hope this helps you.


Que tal!

Hoy les traigo un problema que encontré en mi propia computadora,

Tengo Skype for Business 2016.

image

Cuando intento conectarme a una conferencia, o alguien me agrega o trata de compartirme aplicación, mi cliente se congela y tengo que detener el proceso desde el task Manager.

Ayer,  puse mi atencion a resolver de una vez este issue. y encontre algo mas, cada que detengo mi cliente desde el task manager, el .ost queda bloqueado, asi que no puedo iniciar Outlook or Skype for Business y tengo que reiniciar el equipo.

Image 274

Que puede bloquear un archivo? Mi primera impresión fue Antivirus, mi equipo tiene Kaspersky Endpoint Protection 10 , asi que detuve la protección de la suite y probe,

NO SE CONGELO MÁS!

De nuevo, tenemos que agregar el cliente de Skype for Business a las excepciones/Trusted Zone.

Entonces, inicie el Kaspersky de nuevo y agregue el Lync.exe a las Trusted Zone y aplique los cambios.

Image 276

Ahora ya todo funciona perfecto.

Espero que sea de ayuda.

Lync Server 2013 Orphan users! / Lync 2013 Usuarios Huérfanos

Maybe you find this scenario when you remove users from AD and Lync.

When the company users look for a user that was remove it, still appear.

Print

So, first we think removing the GAL from the client side. Oh surprise no GAL (that’s when I found the AddressBook WebQueryOnly  Policy Configured)

Then, thinking…. If the clients go to web services to find a user, where the web service consult ? ¡¡RTCAB Database!!

So, we use the following query


select * from [rtcab].[dbo].[AbAttributeValue] where Value like ‘%orphanuser%’


The query returns all the entries, and voila! just remove the entry with the userID field


delete from [rtcab].[dbo].[AbAttributeValue] where UserID = ‘UserID’

We search again for that user on the client and no showing any result.

Print


Hope this help you.


Tal vez se han encontrado este problema cuando eliminan a un usuario de AD y de Lync.

Cuando algún usuario de la compañía busca al usuario eliminado, aun aparece.

Print

Así que, lo primero que pensamos fue en remover la GAL del lado del cliente y vaya sorpresa! no tenia el archivo GAL (aquí encontré que el cliente tiene Addressbook WebQueary configurado)

Entonces, pensando… si el cliente va a algún servicio web para encontrar al usuario, donde consulta ese servicio? ¡¡RTCAB DATABASE!!!

Asi que ejecutamos el siguiente query.

select * from [rtcab].[dbo].[AbAttributeValue] where Value like ‘%orphanuser%’


El query regreso todas las entradas con la informacion del usuario y voila!, solo tenemos que eliminar esta info que aun queda en la base utilizando el UserID


delete from [rtcab].[dbo].[AbAttributeValue] where UserID = ‘UserID’

Buscamos nuevamente al usuario, y no aparece ya.

Print


Espero sea de ayuda.

Skype for Business Ethical Wall [Multiux]

Hey!

Today I bring to you an awesome Tool. MULTIUX Ethical Wall ( you can see more information here)

How many times a client ask you to restrict communications between OU’s , or that no one can IM at CIO. Or at bank or financial company to only allow some cashers or user to receive IM nothing more else.

Well, the soution for that is a thrid party tool called ETHICAL WALL.

I will show how Multiux Ethical Wall can help us to get the client target.

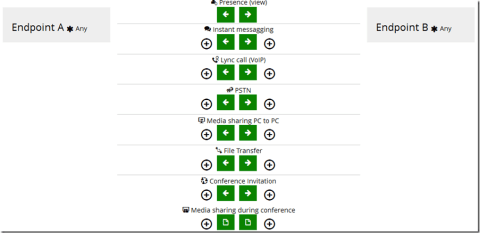
We can block communications between endpoint in the following scenarios.

image

As you can see, we have two sides (Endpoint A and Endpoint B) and in the middle we have the actions we have allow/block between those endpoints.

An Endpoint is not only one user, an Endpoint can be an OU, Federate Domain, etc. Here the list with all Endpoint possibilities.

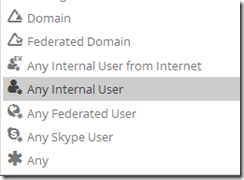
image

image


Now let me show you how EthicalW all works.

Example 1.

image

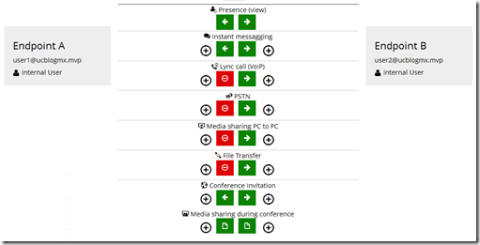
In the previous image you can see that we have two internal users, Endpoint A (user1@ucblogmx.mvp) and Endpoint B (user2@ucblogmx.mvp) . I block user2 to call, share and transfer to user1.

If user2 send a file to user1 , they receive the following error.
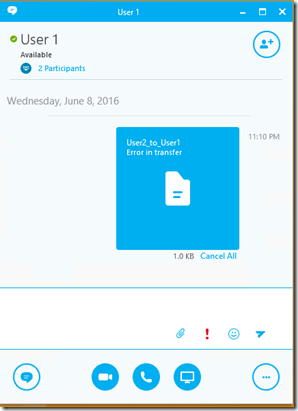
image

But user1, can send file to user2 without problem.
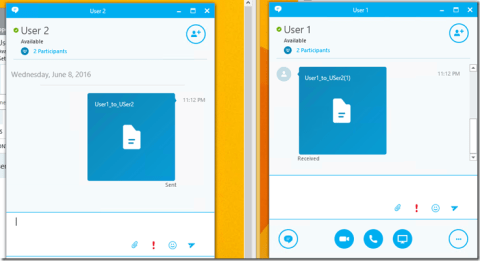
image

EXAMPLE 2.

Now, I will show you how can block all communications from Mortal Users to Managers.

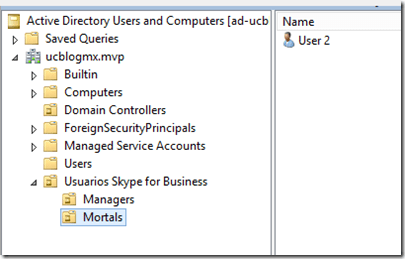
I have two OU’s Managers and Mortals.

User1 is member of Managers OU

image

User2 is member of Mortals OU

image


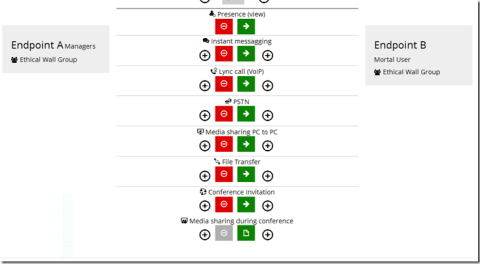
Now, the Ethical Wall Rule was set as follow.

image

Where only Managers OU Users can communicate to Mortal OU Users.

Here how a Manager can communicate with Mortal User

image

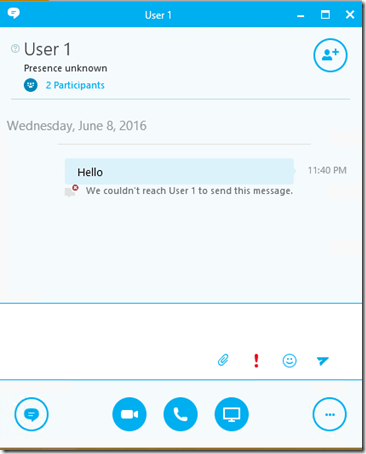
But when a Mortal User try to IM a Manager Users , look like this.

Image 256image

The user1 status presence doesn’t show to user2, and when try to send a IM , ethical wall reject the communications.

This is just an overview, soon I will post how to install the trial version and configure the rules.


Hope this help you.

NOTE:  Thanks to fabbricadigitale for the oportunity and support to try Ethical Wall.


Que tal!

Hoy les traigo una herramienta muy útil. MULTIUX Ethical Wall (pueden revisar mayor información  aquí)

Cuantas veces un cliente les pide restringir la comunicación entre OU’s , o que nadie pueda enviar IM al CIO. O en las compañías bancarias y financieras solamente permitir que los cajeros o usuarios reciban IM únicamente, que no hagan otra acción.

La solúción a esto es una herramienta de 3ros llamada ETHICAL WALL

Les motrare como Multiux Ethical Wall puede ayudarnos a cumplir con el objetivo del cliente.

Podemos bloquear comunication entre dos endpoint en los siguientes escenarios.
image

Como pueden ver, tenemos dos lados (Endpoint A y Endpoint B) y en medio tenemos las acciones que podemos permitir/bloquear entre esos dos endpoints.

Un Endpoint no solamente es un usuario, un endpoint puede ser una OU, un dominio Federado, etc. Aqui esta la lista con todas las posibilidades de Endpoint.

image

image


Ahora les mostraré como Ethical Wall trabaja.

Ejemplo1.
image

En la imagen previo pueden ver que tenemos dos usuarios internos , Endpoint A (user1@ucblogmx.mvp) y Endpoint B (user2@ucblogmx.mvp) . Se bloqueo al usuario 2 la posibilidad de llamar, compartir escritorio y transferencia de archivos al user 1.

Si el usuario 2 envia un archivo al usuario 1, recibe el siguiente mensaje de error.

image

Pero el usuario 1 puede enviar archivos sin problema.

image

EJEMPLO 2.

Ahora les mostraré como bloquear comunicaciones de usuarios mortales a los Gerentes/Administradores

Tengo dos Ou’s Managers y Mortals

El usuario 1 es miembro de la OU Managers

image

El usuario 2 es miembro de la OU Mortals

image


Ahora, la regla del ethical wall quedo de la siguiente manera.
image

Donde solamente los usuarios de la OU Managers, pueden comunicarse con los usuarios de la OU Mortals

Aqui como un Gerente puede comunicarse con un usuario mortal.

image

Pero cuando un mortal intenta buscar a un Gerente, se ve lo siguiente.


Image 256image

La presencia del usuario1 no se muestra al usuario2, y cuando intenta enviar IM , el ethical wall rechaza la comunicación.

Esto solamente es un resumen, pronto subiré un post sobre como instalar la versión trial y configurar las reglas.

Espero sea de ayuda.

NOTA: Agradezco a fabbricadigitale por la oportunidad y apoyo para probar Ethical Wall.
SfB Ext Edge Certificate Automatic Request

Hey!

Today I bring to you one script to automatically request the External Edge Certificate, you must set how many days before you want to request the new certificate (by default I set 30 days) then, the script generates the .txt with all the information to send to your Third Part Certificate Vendor.

And the script send you to you mail address!, so you don’t need to access the server.

As the previous script, you need to fill an input part.

Image 214

After fill all the information, you can schedule a task to run this script every week of 15 days.

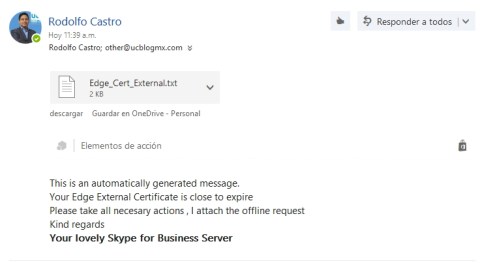
When the time is close to expire, the script will send you an email like this.

Image 213

Once you get your certificate back you need to set it to Edge Server.  (Sorry , I will working to fix this part to do automatically)

You can download here

Hope this will help you.


Que tal!

Hoy les traigo un script que realiza automaticamente el request para el certificado Externo del Edge, deberan de configurar cuantos días antes de que expire el certificado quieren la notificicación (yo deje 30 días por defecto) entonces, el script generara el .txt con toda la informacion para que la envien a su proveedor de Certificados Públicos.

Y el script te lo enviara a tu correo electronico!, asi que no necesitas ni entrar al servidor.

Como en los script anteriores, necesitas llenar algunos datos.

Image 214

Despues de llenar toda esta información, puedes programar una tarea para ejecutar el script cada semana o cada 15 dias.

Cuando llega el tiempo determinado antes de vencer, el script te enviara un correo como este:

Image 213

Una vez que tengas tu certificado, necesitaras asignarlo al servidor Edge (Lo lamento, estaré trabajando para dejar todo esto en automatico)

Pueden descargar el script aquí

Espero sea de ayuda..


Skype for Business Automatic Cert Renewal Edge Internal

Hey!

I brought to you the automatic renewal for a FE Pool in the last post. Today is turn to automatic renewal for Edge Internal Certificate.

This script automatically renew the Edge Internal Certificate.

Just schedule a task to run the script every week and listo!

As the previous script , you need to fill an input information

$day =  here you set how many days before expiration you want to renew your certficate (I put 15 days by default)

$ca = The Certification Authority Path ” FQDN Server\ CA NAME”

$caaccount = User Account with admin privileges on CA.

$capassword = Account Password

$FriendlyName = The Friendly Name you wish to your certificate

$domainName = Edge Pool FQDN and/or Edge Servers FQDN / Subject Alternatives Names

Image 211.jpg

Once you set all information, you can configure a schedule task to run every week.

You can download here

Hope this help you.

*********************************************************************

Que tal!

Ya les había traído la manera automatica de renovacion de los certificados de un Pool de FE en el post pasado. Hoy es turno de la renovación automatica del certificado Interno del Edge..

Este script renovará automaticamente el Certificado Interno del Edge.

Solo programa la ejecución del script cada semana y listo!

Como en el script previo, necesita que llenes un poco de información

$day =  here you set how many days before expiration you want to renew your certficate (I put 15 days by default)

$ca = The Certification Authority Path ” FQDN Server\ CA NAME”

$caaccount = User Account with admin privileges on CA.

$capassword = Account Password

$FriendlyName = The Friendly Name you wish to your certificate

$domainName = Edge Pool FQDN and/or Edge Servers FQDN / Subject Alternatives Names

Image 211.jpg

Una vez que este lista toda la información, programa la ejecución del script una vez por semana y olvidate de preocuparte por renovarlo.

Puedes descargarlo  aquí

Espero sea de ayuda.

Skype for Business Automatic Certificate Renewal

Hey!

Today I bring to you a script to renew automactically the Front End Certificates, this .ps1 can be run with Task Scheduler every week, and when it found 15 days to certificate expiration will renew the certificate.

The .ps1 file have an Input part, where you must fill with your own information.

$day =  here you set how many days before expiration you want to renew your certficate (I put 15 days by default)

$ca = The Certification Authority Path » FQDN Server\ CA NAME»

$caaccount = User Account with admin privileges on CA.

$capassword = Account Password

$FriendlyName = The Friendly Name you wish to your certificate


Image 209

Once you fill the information, you can schedule a task to execute this .ps1 file every week (maybe at weekend)

You can download the script here

Version 2.0 download here!

Hope this help you.

**********************************************************************


Que tal!

Hoy les traigo un script para automatizar la renovación de sus certificados en el Front End. Y pueden programar la ejecucion del script utilizando el task scheduler para correrlo cada semana, si ve que faltan 15 dias para expirar renovara el certificado.

El archivo tiene una parte para que ustedes la llenen con sus datos.

$day =  Aqui pondran cuandos dias antes de expirar desean se renueven los certificados (puse 15 por defecto)

$ca = El nombre de la CA en el formato » FQDN Server\ CA NAME»

$caaccount = Cuenta de usuario con permisos de admin de la CA.

$capassword = Contraseña

$FriendlyName = El nombre con el que identificaran al certificado.

Image 209

Una vez que llenen la informacion, pueden programar la ejecutacion de la tarea semanalmente (tal vez cada fin de semana)

Pueden descargar el script aqui

Version 2.0 Descargala aqui

Espero les sea de ayuda.


Skype for Business full doc CHM File

Hello,

Today I bring to you all Skype for Business Server 2015 Technet Documentation in one .chm File (cmdlets are not in this file, but you can download cmdlets .chm file here )

I know that more than one of you love offline documentation (chm files), and sometimes is hard to find a especific topic at Technet site. So that’s why I put all the information in one offline file (.chm) .

Easy to find any topic, no Internet needed, and only 12 MB size. DOWNLOAD HERE

UPDATE: I was asked to remove my material, because is not the last version at Technet.

I’m so sorry.

Also, I will try to keep updating every three months.

Please Share it.

Hope this help you.


If you cannot see detail . do the follow:

  • Select chm file.
  • Right-click, Properties
  • Under General Tab , at Security click Unblock.Image 167

**********************************************************************

Que tal,

El día de hoy les traigo toda la documentación que se encuentra en Technet de Skype for Business Server 2015 en un solo archivo .chm (los cmdlets no se encuentran en el archivo, pero si desean el .chm para los cmdlets lo puedes descargar aquí

Se que mas de uno ama la documentacion offline (archivos .chm) ademas de lo complicado que luego resulta encontrar un tema en especifico en el portal de Technet. Es por eso que junte toda la informacion en un solo archivo chm.

Facil de encontrar cualquier tema, sin necesidad de estar conectado a internet y solo pesa 12 MB. DESCARGAR AQUÍ

ACTUALIZACION: Me fue pedido quitar mi material, debido a que puede estar desactualizado del que se encuentra en Technet.

De verdad una disculpa,

Tambien tratare de mantenerlo actualizado cada 3 meses.

Por favor compartanlo.

Espero que sea de ayuda.


Sino puedes ver el panel de detalle realiza lo siguiente

  • Selecciona el archivo chm
  • clic-derecho, Properties
  • En  General Tab , en Security, click Unblock.Image 167


.


Deploy Skype for Business Client vía GPO

Hello I bring to you a way to deploy Skype for Business with Office 365 Click-to-run tool.

First we need to Download Office 2016 Deployment Tool from here

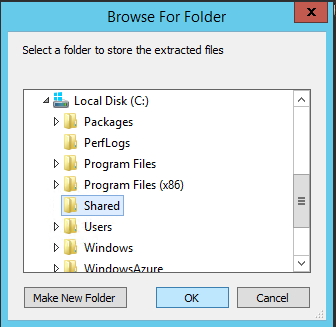
Then we need to shared a Folder in one Machine (This Folder must be accesible from any user computer, will be the Installation repository)

I create a Folder Named «Shared» (Yes , I Know, Such Original!) and give Everyone Read-Only Permission.

Unzip the Office 2016 Deploymet Tool Files at Shared Folder

Image 183

As we only want to Install Skype for Business we need to modify the configuration.xml file like this. (We will use 32 bits version as Recommended Version)

First modify the initial configuration file to download the Office Suite

<Configuration>
<Add SourcePath=»\\server\Shared_File» OfficeClientEdition=»32″>
<Product ID=»O365ProPlusRetail» >
<Language ID=»en-us» />
</Product>
</Add>
</Configuration>

My configuration.xml file look like this

Image 202

Then execute the follow to download the necessary files

\\server\shared_folder\setup.exe /download \\server\shared_folder\configuration.xml

For me, will be as follow.

Image 188

An Office Folder will be added to our Shared Folder.

Image 198

Now, we need to create a .cmd file as Follow.

IF EXIST «C:\Program Files (x86)\Microsoft Office\root\Office16\lync.exe» (goto End) else (goto Install)
:Install
start \\ad-ucblogmx\Shared\setup.exe /configure \\ad-ucblogmx\Shared\configuration2.xml
:End

Put the .cmd in the same Shared Folder.

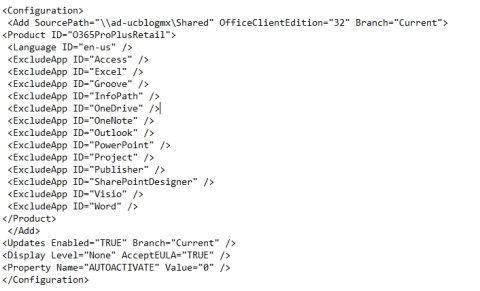
And create a second .xml file (I called Configuration2.xml) where select only Skype for Business to Install.

<Configuration>
<Add SourcePath=»\\server\share_folder» OfficeClientEdition=»32″ Branch=»Current»>
<Product ID=»O365ProPlusRetail»>
<Language ID=»en-us» />
<ExcludeApp ID=»Access» />
<ExcludeApp ID=»Excel» />
<ExcludeApp ID=»Groove» />
<ExcludeApp ID=»InfoPath» />
<ExcludeApp ID=»OneDrive» />
<ExcludeApp ID=»OneNote» />
<ExcludeApp ID=»Outlook» />
<ExcludeApp ID=»PowerPoint» />
<ExcludeApp ID=»Project» />
<ExcludeApp ID=»Publisher» />
<ExcludeApp ID=»SharePointDesigner» />
<ExcludeApp ID=»Visio» />
<ExcludeApp ID=»Word» />
</Product>
</Add>
<Updates Enabled=»TRUE» Branch=»Current» />
<Display Level=»None» AcceptEULA=»TRUE» />
<Property Name=»AUTOACTIVATE» Value=»0″ />
</Configuration>

For my lab the configuration2.xml look like this.

Image 204

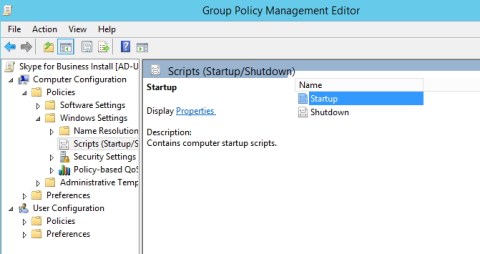
Now, from Group Policy Manager, create a GPO. I name my GPO «Skype for Business Install»

Edit your GPO, go to Computer Configuration->Windows Settings -> Scripts (Startup/Shutdown) , Select Startup

Image 190

Now, add the Network Path to our .cmd File (must be the network path, not local disk)

Image 197

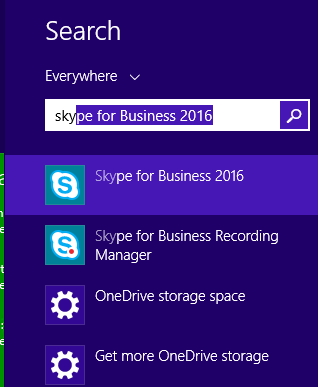
and Listo! The users computers will have Skype for Business installed.

Image 205

Hope this will help you.


Muting Skype for Business – Shortcuts like a Master [3]

Hello,

Today it’s turn to take back control when you shared your Desktop or an App.

Hope this will help you.

Regards.


Que tal,

Hoy es turno de retomar el control cuando estas compartiendo tu escritorio o una aplicación.

Espero les sea de ayuda.

Muting Skype for Business – Shortcuts like a Master [2]

Hi,

I bring to you the second video of Shortcuts like a Master, from my video serie Muting Skype for Business.

Activate/Deactivate camera on current Videcall

Hope this will help you.


Que tal,

Les traigo el segundo video de Shortcuts like a Master, de mi video serie «Muting Skype for Business»

Activar /Desactivar camara en videollamada activa.

Espero les sea de ayuda.